Hi,
@Bigted wrote:
Can you post how you did that, I tried running Speedtest from my PI but it is being throttled
Of course I can and I will do so

.
As said, especially older versions of the Raspberry Pi, will, because of the limitation of their Ethernet port, throttle the results of the speedtest application, if used with high speed networks.
Therefore it might not be useful to run speedtest-cli, as provided by Sivel (
https://github.com/sivel/speedtest-cli) to run on older models of RPi.
Do not use the speedtest-cli, as installed from the repo, as it contains a bug.
To have the most reliable result from Speedtest, which is not influenced by other hardware, such as switches, etc, it is recommended to install the test on a device with direct connection to your internet modem/router. Of course the Ethernet port of that device should be capable of handling the download and upload speed. Perhaps you can install it on your router/gateway.
In my case I have installed it on a ClearOS (CentOS based) server, running on a HP Microserver GEN 8. This is Linux based!
You can download the OOKLA Speedtest at:
https://www.speedtest.net/apps/cli and choose your platform.
Install the program for your platform and run it once installed. The first time, you have to accept the license. The key is stored on your machine and you don't have to bother about it.
As I have running this program on a Linux based machine and as I wanted to have the data published on my MQTT server, you have to install, at least, mosquitto_pub on your hardware. This is part of the mosquitto_client package, but may differ for your platform.
I wanted to have the same functionality as provided by xorfor's python script for Domoticz. So that means 3 sensors for resp. Ping, Download speed and Upload speed. In addition 1 push button to activate the test manually.
For the last function I needed another program, called mqtt-launcher, provided by J.P. Mens:
https://github.com/jpmens/mqtt-launcher.
Install also the requirements for this program. See the README file.
I copied this program in the directory /usr/local/bin.
If you do not need/want the manual push-button in Domoticz, you do not need to install mqtt-launcher.
In this case you have to activate the speedtest by means off a cronjob.
In the same directory I created a script file, called speedtest2mqtt.sh.
The contents of this file (I included also the "help" file of speedtest in it) is as follows:
Code: Select all
#!/bin/bash

# Speedtest by Ookla is the official command line client for testing the speed and performance of your internet connection.
#
# Version: speedtest 1.0.0.2
#
# Usage: speedtest [<options>]
#  -h, --help                        Print usage information
#  -V, --version                     Print version number
#  -L, --servers                     List nearest servers
#  -s, --server-id=#                 Specify a server from the server list using its id
#  -I, --interface=ARG               Attempt to bind to the specified interface when connecting to servers
#  -i, --ip=ARG                      Attempt to bind to the specified IP address when connecting to servers
#  -o, --host=ARG                    Specify a server, from the server list, using its host's fully qualified domain name
#  -p, --progress=yes|no             Enable or disable progress bar (Note: only available for 'human-readable'
#                                    or 'json' and defaults to yes when interactive)
#  -P, --precision=#                 Number of decimals to use (0-8, default=2)
#  -f, --format=ARG                  Output format (see below for valid formats)
#  -u, --unit[=ARG]                  Output unit for displaying speeds (Note: this is only applicable
#                                    for ‘human-readable’ output format and the default unit is Mbps)
#  -a                                Shortcut for [-u auto-decimal-bits]
#  -A                                Shortcut for [-u auto-decimal-bytes]
#  -b                                Shortcut for [-u auto-binary-bits]
#  -B                                Shortcut for [-u auto-binary-bytes]
#      --selection-details           Show server selection details
#      --ca-certificate=ARG          CA Certificate bundle path
#  -v                                Logging verbosity. Specify multiple times for higher verbosity
#      --output-header               Show output header for CSV and TSV formats
#
# Valid output formats: human-readable (default), csv, tsv, json, jsonl, json-pretty
#
# Machine readable formats (csv, tsv, json, jsonl, json-pretty) use bytes as the unit of measure with max precision
#
# Valid units for [-u] flag:
#   Decimal prefix, bits per second:  bps, kbps, Mbps, Gbps
#   Decimal prefix, bytes per second: B/s, kB/s, MB/s, GB/s
#   Binary prefix, bits per second:   kibps, Mibps, Gibps
#   Binary prefix, bytes per second:  kiB/s, MiB/s, GiB/s
#   Auto-scaled prefix: auto-binary-bits, auto-binary-bytes, auto-decimal-bits, auto-decimal-bytes
#
# Script to push speedtest results to mqtt server (Mosquitto)
# Uses mosquitto_pub
# In order to use crontab use full path

/usr/bin/speedtest --format=json | /usr/bin/mosquitto_pub -L mqtt://user:password@<IP_address>:1883/speedtest/status -s
Insert your own IP address of the MQTT server after @. If you have protected your MQTT server with a username and password, insert this as well.
This will publish the data to your MQTT server under the topic speedtest/status. You can change that, if you want it.
In case you have choosen to use the manual activation button in Domoticz you have to configure "launcher.conf", which is used by mqtt-launcher.
See also the installed example file.
The contents of this file is as follows:
Code: Select all
logfile         = '/usr/local/bin/mqtt-launcher.log'
mqtt_broker     = 'IP_address'                 # default: 'localhost'. If using TLS, this must be set to the domain name signed by your TLS certificate.
mqtt_port       = 1883                         # default: 1883
mqtt_clientid   = 'mqtt-launcher-2'
mqtt_username   = 'user'
mqtt_password   = 'password'
mqtt_tls        = None                         # default: No TLS

topiclist = {

    # topic                     payload value           program & arguments

    "speedtest/cmd":            {
                                     'on'               :   [ '/usr/local/bin/speedtest2mqtt.sh' ],
                                },
}
Insert your IP adress between ' ' and if you have your MQTT server protected insert username and password between ' '.
In the directory /user/local/bin I have now the following programs:
Code: Select all
-rw-r--r-- 1 root root    689 Feb 14 16:49 launcher.conf
-rw-r--r-- 1 root root   1732 Feb 13 19:09 launcher.conf.example
-rw-r--r-- 1 root root    286 Feb 14 16:47 mqtt-launcher
-rw-r--r-- 1 root root 133309 Mar 29 16:00 mqtt-launcher.log
-rwxr-xr-x 1 root root   5234 Feb 13 19:09 mqtt-launcher.py
-rw-r--r-- 1 root root   3925 Feb 13 19:09 README.md
-rwxr-xr-x 1 root root   2790 Feb 15 14:10 speedtest2mqtt.sh
The next step is to prepare the flow in Node Red.
The flow in Node Red consist of two parts.
1. The incoming flow from your device, that runs speedtest, to Domoticz (Upper part)
2. The outgoing flow from Domoticz and Node Red to activate the speedtest-cli command (Lower part)
If you do not want to use the push button in Domoticz, you do not need the Lower part of the flow.
However in this case, you have to setup a cronjob in the device, which has speedtest-cli installed

- Screenshot_speedtest flow1.png (27.93 KiB) Viewed 13291 times
1. Incoming flow
The first node is a MQTT input node. You have to insert the topic, that you use in the mosquitto_publish command on the device, that has
speedtest-cli installed. In this case speedtest/status.
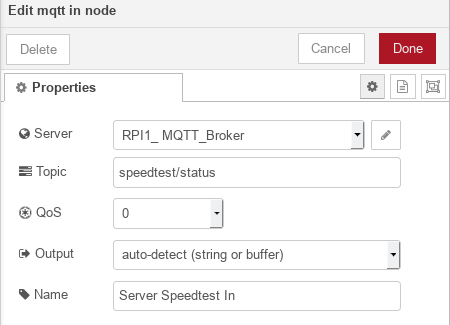
- Screenshot_speedtest flow2.png (18.67 KiB) Viewed 13291 times
The JSON node has its default configuration followed by the Function node, with the following contents:
Code: Select all
var msg1 ={};
var msg2 ={};
var msg3 ={};
msg1.payload = {"command":"udevice","idx":119,"nvalue":0,"svalue":msg.payload.ping.latency.toString()};
msg2.payload = {"command":"udevice","idx":120,"nvalue":0,"svalue":(parseFloat((msg.payload.download.bytes*8/msg.payload.download.elapsed)/1000).toFixed(3)).toString()};
msg3.payload = {"command":"udevice","idx":121,"nvalue":0,"svalue":(parseFloat((msg.payload.upload.bytes*8/msg.payload.upload.elapsed)/1000).toFixed(3)).toString()};
return [[msg1,msg2,msg3]];
The outgoing node is a MQTT output node.
Do not forget, if you have not done yet, to configure Domoticz with the right custom sensors and replace the idx numbers with your idx's.
The next part is in a next post.