If you are reading this, you probably know how to use a Raspberry Pi and to install Domoticz.
Perhaps, the Raspberry Pi Zero W is a little bit different, so feel free to check:
Step 1. You can use a pre-installed NOOBS SD-card or prepare an empty SD card.
For creating a SD-card from scratch, use program 'ImageWriter'. As source I used the image '2017-03-02-raspbian-jessie.img'. Please see internet.
Step 2. Initialize the Raspberry Pi.
Connect the Raspberry Pi Zero W to a monitor and an USB hub. You will need a microUSB adapter. For the monitor you will need a mini HDMI to HDMI adapter.

- RaspberrPiZeroW_connected.jpg (45.73 KiB) Viewed 8629 times
Place the SD-card in the Raspberry Pi Zero W and power on.
Configure:
- Click on the Raspberry Icon --> Preferences --> Rasberry Pi Configuration
- Set your Password
- Set your interfaces --> SSH: Enabled
- Set your Language, Locale, Time zone, Keyboard and Wifi Country
You should presumably reboot.
Step 3. Network.
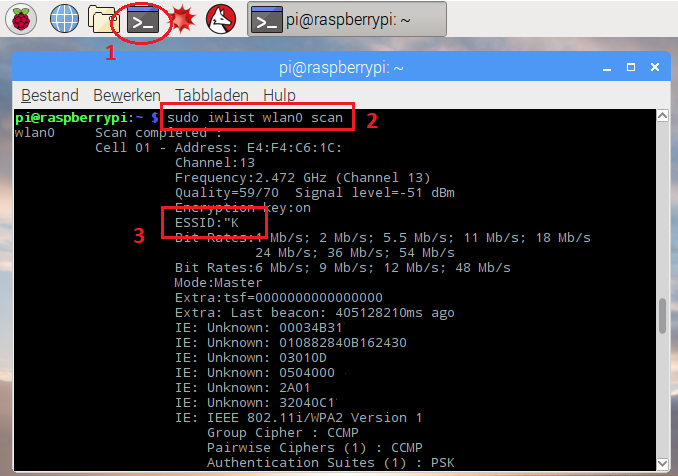
- Open a command shell
sudo iwlist wlan0 scan
- Look for your network in the list. Make a note of the name behind ESSID:
- RaspPiNetwork-01-Scan.png (76.63 KiB) Viewed 8614 times
sudo nano /etc/wpa_supplicant/wpa_supplicant.conf
Go to the bottom of the file and add the following:
network={
ssid="<your network ID as found after ESSID>"
psk="<your network password"
}
- Save the file and reboot
- - - -
- On your monitor, look for the network-icon top right
--> Click Right --> Wireless & Wired Network Settings
--> Select your network
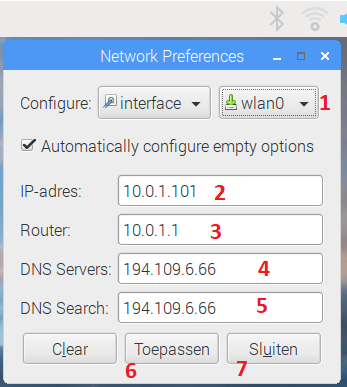
--> Network Preferences --> Interface --> wlan0
Fill the empty fields:
IP-adres -->
192.168.0.123 (choose a suitable IP-address in you IP-range)
Router -->
192.168.0.1 (The gateway from your network to internet)
DNS Servers -->
194.109.6.66 (The DNS server of your internet provider)
DNS Search -->
194.109.6.66 (The DNS server of your internet provider)
- RaspPiNetwork-04-Preferences.png (34.04 KiB) Viewed 8614 times
- Save and reboot
- - - -
- You should now have a working internet connection.
- The Raspberry Pi Zero W has a problem updating its date and time. We use an alternative:
- Open a command shell
sudo route add default gw 192.168.0.1 (use the IP-address of your gateway)
sudo apg-get install htpdate
- Maak deze instellingen permanent:
sudo nano /etc/rc.local
- before the line with 'exit 0' type
sleep 15
sudo route add default gw 10.0.1.1
sudo htpdate http://www.raspbian.com
Save (<Ctrl> <O>) and close nano (<Ctrl> <X>)
sudo reboot
Step 4. Update the Raspberry Pi.
- Open a command shell
sudo apt-get update
sudo apt-get dist-upgrade
- Remove unnecessary software (if you want to)
- Don't forget to answer Yes so now and then; it can take a long time.
sudo apt-get remove mathematica-fonts wolfram-engine scratch sonic-pi nodered oracle-java8-jdk
sudo apt-get remove minecraft-pi dillo gpicview penguinspuzzle oracle-java8-jdk openjdk-7-jre oracle-java7-jdk openjdk-8-jre
sudo apt-get remove libreoffice-writer libreoffice-calc libreoffice-base libreoffice-impress libreoffice-draw libreoffice-math libreoffice
sudo apt-get clean
sudo apt-get autoremove
sudo reboot
Step 5. Remote access
If you like to work 'remote' with your Raspberry PI, for example from your Windows PC, install software for Windows Remote Desktop:
- Open a command shell
sudo apt-get install vnc4server
sudo apt-get install xrdp
Try to connect from your desktop...
Step 6. Install Domoticz
sudo curl -L install.domoticz.com | sudo bash
- We will use GPIO pins, so make them available
sudo nano /boot/config.txt
- Go to the bottom of the file and add:
dtoverlay=w1-gpio
enable_uart=1
Save (<Ctrl> <O>) and close nano (<Ctrl> <X>)
sudo nano /boot/cmdline.txt
- look for the text "console=serial0,11520"
- remove this text and leve the part before it and the part behind it unchanged.
Save (<Ctrl> <O>) and close nano (<Ctrl> <X>)
- Make the necessary changes to the Domoticz startup-script:
sudo nano /etc/init.d/domoticz.sh
- look for the line '### END INIT INFO' (line 9)
- add the following text:
# for resetting the Arduino
# Physical Pin 12, GPIO 1, BCM 18
sudo sh -c 'echo 18 > /sys/class/gpio/export'
sudo sh -c 'echo high > /sys/class/gpio/gpio18/direction'
sudo sh -c 'echo 1 > /sys/class/gpio/gpio18/active_high'
# For showing ON status through a LED
# Physical Pin 16, GPIO 4, BCM 238
sudo sh -c 'echo 23 > /sys/class/gpio/export'
sudo sh -c 'echo high > /sys/class/gpio/gpio23/direction'
sudo sh -c 'echo 1 > /sys/class/gpio/gpio23/active_high'
Save (<Ctrl> <O>) and close nano (<Ctrl> <X>)
sudo reboot
Now you should have a working Domoticz system