
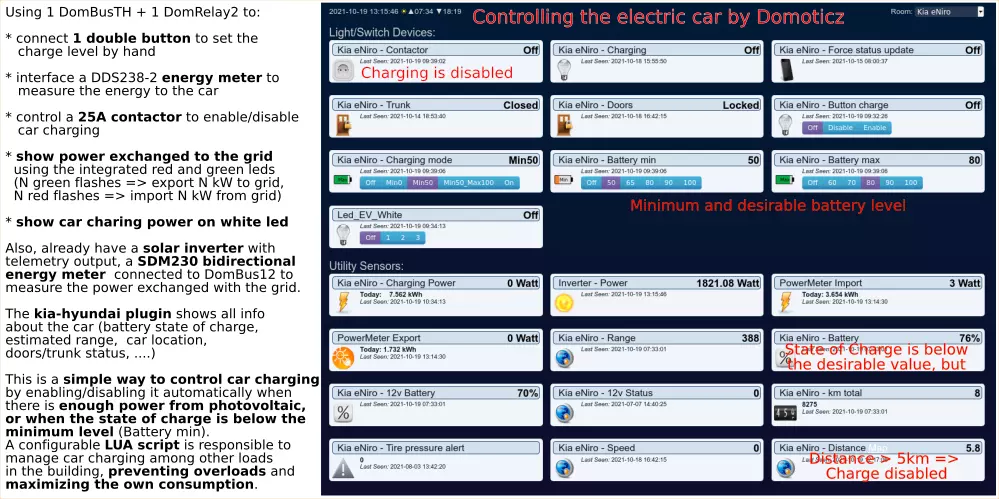
Because in this way you can monitor the electric car parameters for a unique panel where you have all controls of your Smart Home.
Because you can easily monitor the state of charge of the car battery.
Because you can avoid charging when total imported power from the grid is very high, preventing electricity meter disconnections.
But the most important thing, you can also charge the electric vehicle using the most energy from renewable, for example if you have a solar photovoltaic system.
Below you will set two different battery level thresholds, in the domotic panel:
* a min battery level below which the car is charged using any kind of electricity source
* a max battery level above which the car stop charging: also, when state of charge is between min and max levels, the car will be charged only when the photovoltaic system produces enough to avoid imporing energy from the grid
Solution 1: using standard EVSE cable
In this case the electric vehicle is connected through the charging cable provided with the vehicle: no need for a wallbox or supplementary EVSE controllers.
PROS:
* very cheap solution: don't need for expensive wallbox or EVSE systems. Just use the standard cable provided with the vehicle, and few low-cost devices to enable/disable charge and, possibly, to monitor the energy used to charge the vehicle to make some statistics on energy consumption, EV battery charging efficiency, ...
CONS:
* charging current/power can be manually selected on the EVSE cable, but not automatically, with the result that it's not possible to maximize the own consumption, charging at higher or lower currents depending by the available power from photovoltaic.
Prerequisites
* electric vehicle with cloud connection, to know the battery state of charge
* standard EVSE cable provided with the car / vehicle
* electricity meter, to compute the current power and consumed energy (optional)
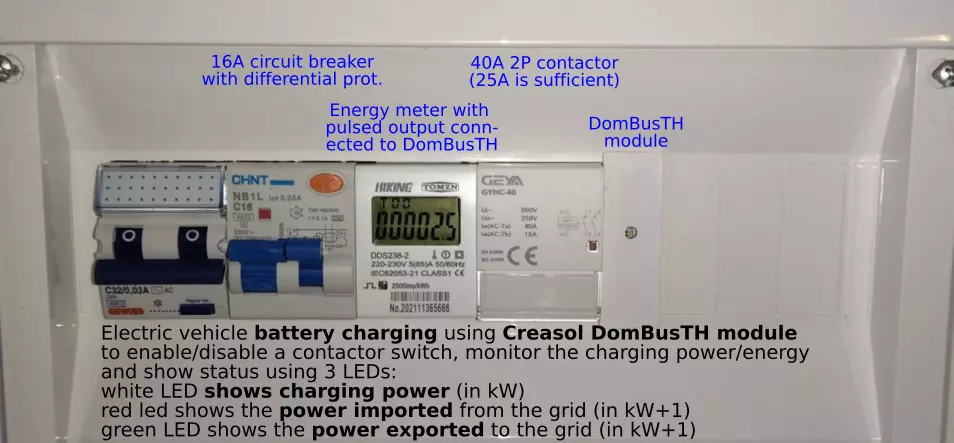
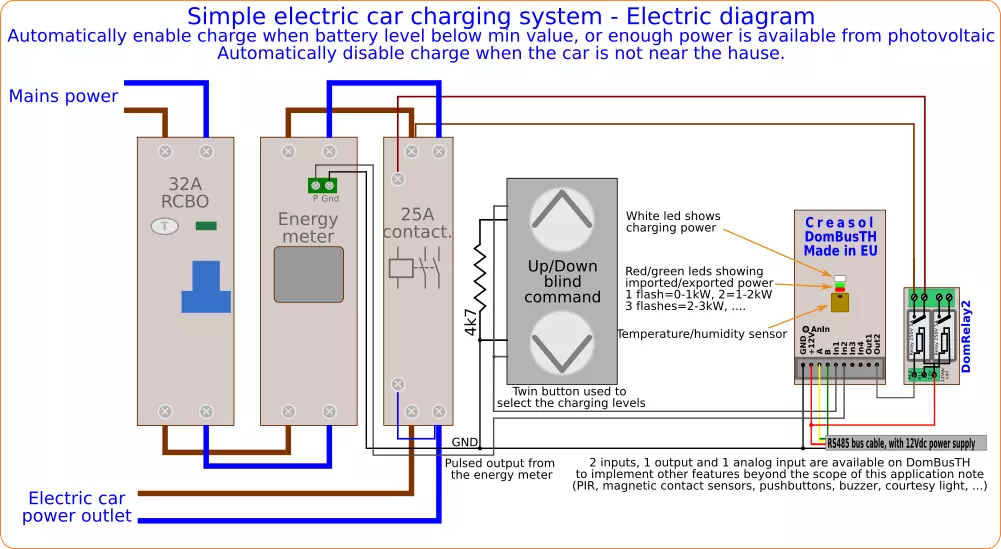
* circuit breaker with differential protection (recommended)
* 2P contactor (or relay) to enable/disable charging
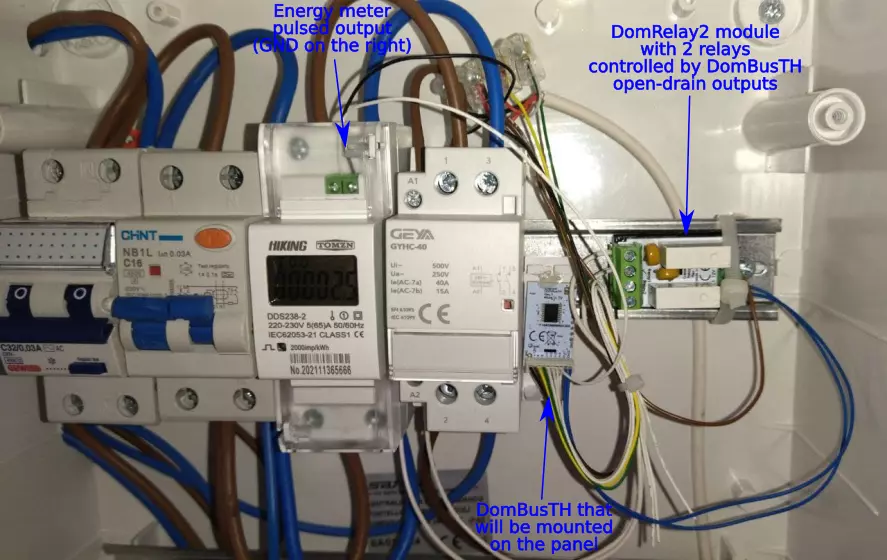
* Creasol DomBusTH + DomRelay2 to get 3 LEDs already available to show electric car charging power and total import/export power on the electricity grid.
Creasol DomBusTH is a domotic module that can be used with Domoticz and Home Assistant that implements all features needed by this project:
* has 2 open-drain outputs (1 is needed) to enable an external relay (DomRelay2 module) to control the 25A/40A 2P contactor;
* has 4 configurable inputs, 1 of which is configured as IN_COUNTER and connected to the electricity meter to measure the charging power and energy, and 1 input is connected to a dual button to set the charging level easily;
* has 3 LEDs that are used to display the charging status (white led) and current import/export power (red and green leds);
* has temperature and relative humidity sensors that are not important for this application, but can be used to monitor the room temperature.
Also, it has 1 or more analog inputs, buzzer output that are beyond the scope of this project. It's a small electronic board that can be fixed with 2 hot-glue points on a blank cover or modular cover.

It can be connected to the domotic controller (Raspberry, Nuc, PC, ...) by a common alarm cable (within 4 wires, 2 wires for power supply and 2 for data) using a cheap USB to RS485 adapter. Obviously, dozens of DomBus modules can be connected using the same bus/cable, forming a reliable domotic network optimized for low power consumption that does not use batteries and do not produce RF pollution.
Electric diagram
Domoticz LUA script
In github repository it's possible to find script_device_power.lua, that should be placed in domoticz/scripts/lua directory, that manages EV charging, checks for power imported from the grid disabled or reducing loads when imported power is near the maximum permitted, enable some loads (electric heaters, dehumidifiers, ...) in case of extra production from photovoltaic, shows current power usage/export on red/green LEDs, activate white leds in case of blackout, ...
The building power management can be easily configured through a separate text config file, config_power.lua , so there is no need to put your hands in LUA coding!