

The principle is simple - we interface the unit through an ESP8266 connected to your WiFi network and update Domoticz using the JSON API. We continually measure the rectified AC voltage on the doorbell's ringing solenoid using the ESP's ADC - if it's above a minimum threshold we send an ON command to a switch in Domoticz.
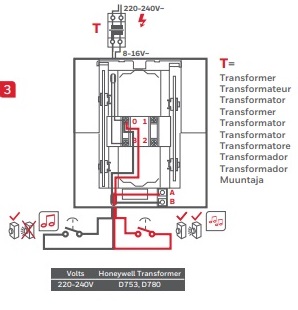
With an oscilloscope, I took various measurements on the 4 connectors of the Honeywell unit and found that between pins 1 and 3 there's a rectified semi-sinewave when the doorbell is sounding. Your doorbell model may have different pin numbers but the principle will be the same as they all use an 8V AC transformer or 4 x 1.5v batteries.
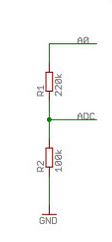
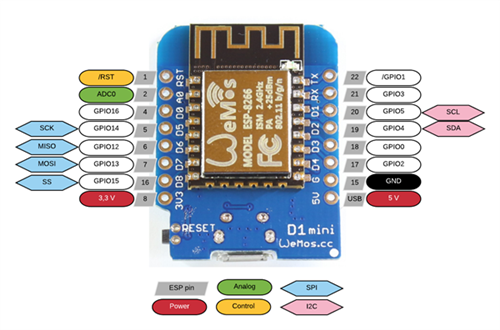
In order to connect this to both Domoticz and Alexa, I used a Wemos D1 ESP8266 module with just a 680K resistor in series with the ADC input (see pinout diagram below). The D1 already has a built-in voltage divider between the A0 input and the actual internal ADC (with 100K to ground and 220K in series with the input pin, i.e. 3.3:1, see diagram). We need to keep the max ADC voltage under 1V so adding an extra 680K in series makes it almost a 10:1 voltage divider which is perfect for the 8V bell transformer usually used with the doorbell. If you run the doorbell using alkaline cells then you can either use a slightly smaller series resistor or else play with the comparison value in the .INO sketch. If you use something other than a Wemos D1 then you can use the same train of thought for your module.
Every 50ms, the ESP will sample the voltage on the A0 input. If its digital equivalent on a scale from 0 to 255 is >150 then the Domoticz switch is set to "ON" for 5 seconds. This automatically debounces your pushbutton. The value of 150 worked fine for my setup but you may want to play with it to get the threshold right.
The Arduino sketch for the D1 is as follows:
Code: Select all
// Wemos D1 sketch for Doorbell Trigger. Uses A0 for input with series 680K resistor
// (c) philchillbill, 2019. No rights reserved.
#include <ESP8266WiFi.h>
#include <ESP8266HTTPClient.h>
// Change these 4 parameters to suit your Domoticz installation
char url[] = "http://192.168.x.y:8080";
char ssid[] = "xxxxxxx";
char password[] = "yyyyyyyy";
const int idxsw = 731;
/// ------------------------------------------------------------
int rssi, tries, prev_raw, raw, httpCode;
String respMsg, prev_cmd, cmd, domo;
WiFiServer server(80);
void setup()
{
Serial.begin(115200);
Serial.println("");
Serial.println("ESP-8266 awake.");
// Connect to WiFi network
Serial.println();
Serial.println("Connecting to WiFi network " + String(ssid));
WiFi.mode(WIFI_STA);
WiFi.begin(ssid, password);
IPAddress ip(192, 168, 178, 45); // Fixed IP address for this module
IPAddress gateway(192, 168, 178, 1); // Router gateway IP
IPAddress subnet(255, 255, 255, 0); // Subnet mask, usually 255.255.255.0
WiFi.config(ip, gateway, subnet);
tries = 0;
while (WiFi.status() != WL_CONNECTED)
{
tries++;
delay(1);
if (tries % 50 == 0)
Serial.print(".");
}
Serial.println("");
Serial.print("WiFi now connected. IP address is ");
Serial.println(WiFi.localIP());
Serial.println("Listening.. ");
server.begin();
}
void loop()
{
HTTPClient http;
pinMode(A0, INPUT);
raw = analogRead(A0);
cmd = "Off";
if (raw > 150)
cmd = "On";
if (cmd != prev_cmd)
{
Serial.println(cmd);
domo = String(url) + "/json.htm?type=command¶m=switchlight&idx=" + String(idxsw) + "&switchcmd=" + String(cmd);
http.begin(domo);
httpCode = http.GET();
http.end();
delay(5000);
}
prev_cmd = cmd;
prev_raw = raw;
delay(50);
}
All that's needed is to:
Connect the GND pin of the D1 to the terminal marked 1
Connect the ADC0 pin of the D1 through a 680K resistor to pin 3 of the Honeywell unit.
There's no wiring to the bellpush as we detect the rectified AC voltage directly at the ringing solenoid using the ADC. The Wemos is powered by a separate 5V USB connection.
You can use the ON-action of the Domoticz switch to trigger any further desired automation or handle it with e.g. dzVents.
If you want Alexa to make an announcement whenever the doorbell is activated, you can modify Alexicz and add the Alexa.DoorbellEventSource interface.
In AlexaSmartHome.py add:
Code: Select all
@INTERFACES.register('Alexa.DoorbellEventSource')
class AlexaDoorbellEventSource(AlexaInterface):
    def name(self):
        return 'Alexa.DoorbellEventSource'
Code: Select all
@ENDPOINT_ADAPTERS.register('Doorbell')
class DoorbellAlexaEndpoint(AlexaEndpoint):
    def __init__(self, endpointId, friendlyName='', description='', manufacturerName=''):
        super().__init__(endpointId, friendlyName, description, manufacturerName)
        self.addCapability(AlexaDoorbellEventSource(
            self, 'Alexa.DoorbellEventSource', proactivelyReported=True))
Code: Select all
        endpoint = None
        endpoint = DoorbellAlexaEndpoint(
            'Doorbell-Push', 'Doorbell Trigger', 'Test Doorbell Trigger', 'philchillbill')
        endpoint.addDisplayCategories('DOORBELL')
        endpoint.addCookie({'denoted': 'Doorbell Push'})
        endpoints.append(endpoint)
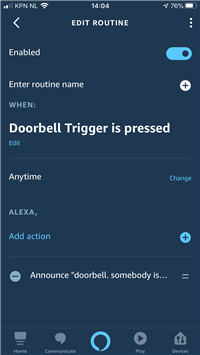
Being an Alexa developer, I have 11 Echos in use all around the house (there's even one in my car). It's pretty cool that they can all double-up as effective doorbell extenders