HI,
I finally found the time and opportunity to finish this project.
I wanted (some of) the temperature sensors of my two HP ProLiant Micro Servers GEN 8 send to Domoticz
I took @cryonic90 python script and modified it, so that it could read the sensors from the ILO interface,
This script is based on
https://github.com/seveas/python-hpilo
The steps are as follows:
1. Install python-hpilo
Code: Select all
sudo apt-get update
sudo apt-get install python-hpilo
Optional:
Code: Select all
sudo apt-get install python-hpilo-doc
sudo apt-get install fonts-roboto
Full documentation can be found here:
http://seveas.github.io/python-hpilo/
2. Next step was the download the ZIP file ilo_data.zip
This file needs some modifications, which depends on the temperatures, you want to monitor and how they are named.
See the example below:
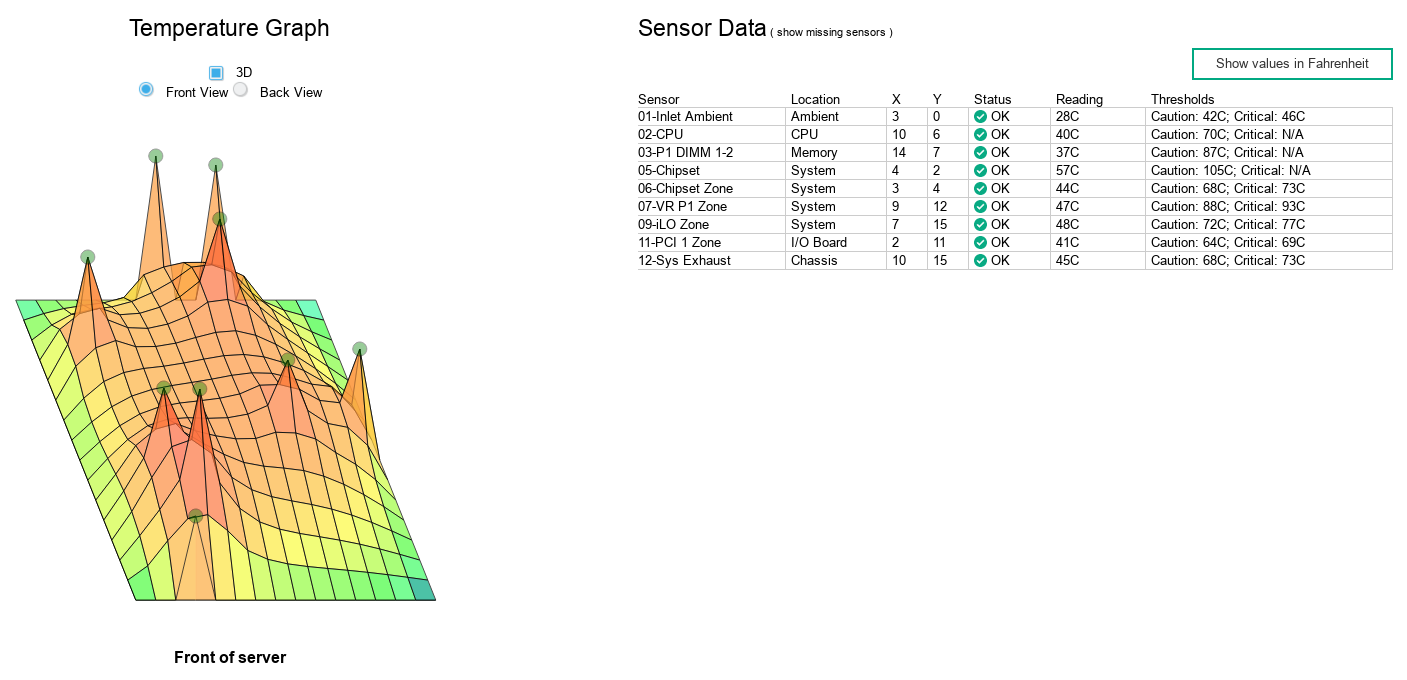
- Screenshot_ILO_NAS_Temp.png (154.65 KiB) Viewed 609 times
In this case you will find the exact sensor names in the column, marked "Sensor". In totally 9 sensors.
This maybe different for other servers.
Code: Select all
#!/usr/bin/env python
# -*- coding: utf-8 -*-
import requests
import json
import sys
import hpilo
ilo_ip = '192.168.10.21'
user = 'Administrator'
password = 'PASSWORD'
ilo = hpilo.Ilo(ilo_ip,user,password)
health_dict = ilo.get_embedded_health()
temperature_Inlet = json.dumps(health_dict['temperature']['01-Inlet Ambient']['currentreading'])
temperature_CPU = json.dumps(health_dict['temperature']['02-CPU']['currentreading'])
temperature_P1 = json.dumps(health_dict['temperature']['03-P1 DIMM 1-2']['currentreading'])
temperature_CS = json.dumps(health_dict['temperature']['05-Chipset']['currentreading'])
temperature_CSZ = json.dumps(health_dict['temperature']['06-Chipset Zone']['currentreading'])
temperature_P1Z = json.dumps(health_dict['temperature']['07-VR P1 Zone']['currentreading'])
temperature_ILO = json.dumps(health_dict['temperature']['09-iLO Zone']['currentreading'])
temperature_PCI = json.dumps(health_dict['temperature']['11-PCI 1 Zone']['currentreading'])
temperature_Sys_Ex = json.dumps(health_dict['temperature']['12-Sys Exhaust']['currentreading'])
Inlet = temperature_Inlet[1:3]
CPU = temperature_CPU[1:3]
P1 = temperature_P1[1:3]
CS = temperature_CS[1:3]
CSZ = temperature_CSZ[1:3]
P1Z = temperature_P1Z[1:3]
ILO = temperature_ILO[1:3]
PCI = temperature_PCI[1:3]
Sys_Ex = temperature_Sys_Ex[1:3]
requests.get("http://192.168.10.50:8080/json.htm?type=command¶m=udevice&idx=406&nvalue=0&svalue="+Inlet)
requests.get("http://192.168.10.50:8080/json.htm?type=command¶m=udevice&idx=407&nvalue=0&svalue="+CPU)
requests.get("http://192.168.10.50:8080/json.htm?type=command¶m=udevice&idx=408&nvalue=0&svalue="+P1)
requests.get("http://192.168.10.50:8080/json.htm?type=command¶m=udevice&idx=409&nvalue=0&svalue="+CS)
requests.get("http://192.168.10.50:8080/json.htm?type=command¶m=udevice&idx=410&nvalue=0&svalue="+CSZ)
requests.get("http://192.168.10.50:8080/json.htm?type=command¶m=udevice&idx=411&nvalue=0&svalue="+P1Z)
requests.get("http://192.168.10.50:8080/json.htm?type=command¶m=udevice&idx=412&nvalue=0&svalue="+ILO)
requests.get("http://192.168.10.50:8080/json.htm?type=command¶m=udevice&idx=413&nvalue=0&svalue="+PCI)
requests.get("http://192.168.10.50:8080/json.htm?type=command¶m=udevice&idx=414&nvalue=0&svalue="+Sys_Ex)
sys.exit()
You need to modify the following to your personal settings:
1. ilo_ip (between ' ')
2. user, HP default Administrator (between ' ')
3. password, as on the attached label (between ' ')
4. the second field between [ ] should match the name of the temperature sensors. See picture above.
5. IP address of your Domoticz server and IDX for the created virtual sensors in the "requests.get(...." line.
The file has been installed in ~/domoticz/scripts/python directory.
If the script runs without errors, you can create a cronjob, in order to run the script periodically.
Regards