Hi,
Reading this thread I don't think this way it is going to work.
However it is quite easy.
In general it is a bad idea to publish messages from external equipment directly into domoticz/in, because the syntax used by the external equipment will not match the syntax expected by Domoticz.
I assume, as I read it, this weather station will transmit a message every 5 minutes and it will look like {"temperature": 28.75, "rain": 0.2794, "windspeed": 0.6628257844249887}. As SweetPants already indicated Domoticz expects something else and it is dependent on the type of sensor.
As I see in the script the weather station gives you 3 sensors:
1. Temperature Sensor (°C)
2. Wind speed (m/s)
3. Rain (mm)
Although that you have the possibility of creating a combined sensor, I recommend to create one virtual sensor for each of the sensors of the weather station. So totally three sensors of the type, resp. Temperature, Wind and Rain. You can create a combined sensor for Wind+Temp+Chill, but in that case you have to calculate the chill. As said not recommended.
So first step is to create the MQTT hardware device.
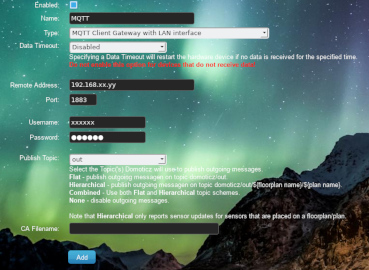
- MQTT Domoticz.png (134.46 KiB) Viewed 2774 times
If you have installed your MQTT broker on the same hardware device as Domoticz you may use "localhost", otherwise fill in the IP address of the broker.
For security reasons I recommend at least to use a username and password combination. You have to set this in your broker as well.
Domoticz will subscribe to domoticz/in and publish to domoticz/out.
I assume that your MQTT broker (Mosquitto?) is properly installed.
If so you should see a lot of messages published to domoticz/out if you connect to the broker with a suitable client.
One I can recommend is MQTTfx (
https://mqttfx.jensd.de).
The next step you should do is to reverse all the changes you have made in the weather.py file.
Or if you are not sure what has been changed re-install it.
The only thing you should modify in that file weather.py is the following:
1. Line 15: Your username and Your password (if you have set a username/password in your broker!)
2. Line 16: Your IP address (or localhost if the broker and the python script runs on the same hardware)
Do NOT change the phrase outside/weather, anywhere in the file.
If you run the script as indicated in the readme file you should be able to subscribe with e.g. MQTTfx to the topic outside/weather.
If everything is alright you will receive something like {"temperature": 28.75, "rain": 0.2794, "windspeed": 0.6628257844249887}
However as Sweetpants also said Domoticz expects another syntax for the sensors.
See:
https://www.domoticz.com/wiki/Domoticz_ ... emperature
The following syntax is required:
For the Temperature Sensor:
Temperature:
/json.htm?type=command¶m=udevice&idx=IDX&nvalue=0&svalue=TEMP
IDX = id of your device (This number can be found in the devices tab in the column "IDX")
TEMP = Temperature
For the Wind Speed sensor:
Wind
/json.htm?type=command¶m=udevice&idx=IDX&nvalue=0&svalue=WB;WD;WS;WG;22;24
IDX = id of your device (This number can be found in the devices tab in the column "IDX")
WB = Wind bearing (0-359)
WD = Wind direction (S, SW, NNW, etc.)
WS = 10 * Wind speed [m/s]
WG = 10 * Gust [m/s]
22 = Temperature
24 = Temperature Windchill
For the Rain Sensor:
Rain
/json.htm?type=command¶m=udevice&idx=IDX&nvalue=0&svalue=RAINRATE;RAINCOUNTER
IDX = id of your device (This number can be found in the devices tab in the column "IDX")
RAINRATE = amount of rain in last hour in [mm x 100]
RAINCOUNTER = continues counter of fallen Rain in [mm]
As an example if you want to send the temperature from the MQTT broker to Domoticz use the following JSON commands:
{
"command": "udevice",
"idx" : 7,
"nvalue" : 0,
"svalue" : "28,75"
}
If you don't have a value insert 0 (zero), otherwise your database may get corrupted.
So you have to convert your payload (message) from the weather station to something above that Domoticz recognizes.
To do that, you have 2 options:
1. If you are a programmer then you can use a scripting language, like LUA, dzVents, Python or PHP or whatever.
2. If you don't feel comfortable in those scripting languages, use Node-Red, as already suggested.
With Node-Red such a conversion is more or less straight forward.
If you don't have NodeJS and Node-Red already installed, install it with the following instructions:
NodeJS:
https://www.instructables.com/id/Instal ... pberry-Pi/
Node-RED:
https://nodered.org/docs/getting-started/installation
If you need further support with the conversion in Node-Red don't hesitate to ask, but publish your results so far.