This is the easyway: https://www.aliexpress.com/item/1005001 ... oD8lO&mp=1
Unfortunately only with standard cam, but look at the price. It's for easy programming
Moderator: leecollings
Code: Select all
const int buttonPin1 = 4;
const int ledPin1 =  13;
Code: Select all
//#define CAMERA_MODEL_AI_THINKER
#define CAMERA_MODEL_M5STACK_PSRAM
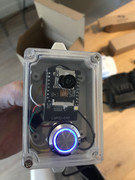


Its indeed the 19mm switch momentary It fits inside the plastic housing 82x58x33 But I had to bend the pins on the back a bit to make it fit good but that's no problem. So the minimal height must be 33 mmEddyG wrote: Sunday 24 January 2021 16:23 Nice.It looks to me that you have a bigger (19mm?) switch, is that so?
@hoeby Did you ever made a 19 mm or 22 mm switch version of you 3-D housing, or tested if its fits in the current housing.
I received my 16 mm switch but I find it a little bit too small. It looks to me that the 19mm would fit in the current housing.
At Ali I see 2 types of switches, complete flat and with elevated push button.
I currently have the flat one. Did any one ordered the elevated one? Any experiance?
No I didn’t try it in hoebys housing but if it’s 20mm height it’s to small for the 19mm see picture heightEddyG wrote: Friday 29 January 2021 16:25 The housing of @hoeby is 70x36x20. Like you wrote yours is a temporary housing. Did you try that 19 mm switch in the hoeby housing?

I would like an option such as battery cover holder for children's toys, 1 screw in the bottomhoeby wrote: Monday 15 February 2021 0:18 Today i started on a new housing.
Main-reasons, wanted to modify it for a bigger push button.
The original 16mm button works, but only when you us a raised head button. Otherwise it is to small.
The new housing is based on a 22mm low profile button
I have chosen the low profile for 2 reasons:
- Couldn't find a 22mm button with a maximum length of 20mm
- Keeps the housing length shorter.
some links about the button, which i use:
https://www.rjselectronics.com/products ... p-25m-f-r/
https://www.aliexpress.com/item/1005001 ... web201603_
Housing is not finished. But could somebody think with me, how to mount the housing?
I can make 2 screw sockets, like to other housings. But it also possible to make a small frame and then 2 small screws (from top and bottom).
But are there better ways to mount it?
Red lines = ESP32cam
Blue lines = Nut
Blue Circle = The push button
Cyan line = Nut, but 90 degrees rotate against the blue line
I know what you mean.Ivo1986 wrote: Monday 15 February 2021 15:13 I would like an option such as battery cover holder for children's toys, 1 screw in the bottom


Nice jobhoeby wrote: Monday 15 February 2021 16:54I know what you mean.Ivo1986 wrote: Monday 15 February 2021 15:13 I would like an option such as battery cover holder for children's toys, 1 screw in the bottom
For now i made the drawing with 1 screw at the top and 1 at the bottom.
Reason for this, a 3-axel mill can't drill on an angle. But for 3d printer it shouldn't be a problem.
Will make a modification. So that there is a 1 screw and a 2 screw version.
First protoype came of the printer.
The backplate has an opening. I use this to see how things fit inside.
There will be a backplate, which is completly closed.
Front side. The length is almost the same as the old version. But it looks smaller.
Maybe the rounded top and bottom will make it look smaller
Button size, outside 25mm
The hole in the housing is 22mm.
Only made for low-profile buttons
Inside
120 degree camera and button
Here you see, why only low-profile buttons.
The esp will be mounted over the button
Bottom in place
Users browsing this forum: No registered users and 1 guest