Four Socket Switch with return channel (Ikea, Arduino, Relays, KaKu)

Others (MiLight, Hue, Toon etc...)

Moderator: leecollings

Post Reply
mjdb
Posts: 71
Joined: Thursday 12 January 2017 13:38
Target OS: Raspberry Pi / ODroid
Domoticz version: all beta
Location: NL - Pijnacker
Contact:

Four Socket Switch with return channel (Ikea, Arduino, Relays, KaKu)

Post by mjdb »

Introduction

In this thread I describe a project to build a 4 relay Switch based on Kaku (CoCo) (Klik Aan Klik Uit) commands.
The "extra" is that it also has a return-channel for each switch.

Why...
- Sometimes you need multiple switches at a specific location. Loose socket-switches take space and sometimes "disturb" one-another.
- The Kaku-protocol (fire and forget) has no method of detecting if a command was received and executed. This is fine if you use it for human-operated switches only, but is unhandy for automated actions.
- This purpose can be achieved with beautiful designed and quite handy z-wave switches from (for example) Fibaro. For four switches you will have to invest 240 Euro or so.
- And, last but not least, it is nice to tinker and learn electronics.

- This project is based on a Ikea KOPPLA 4-socket switch wich has also 2 USB ports for charging (15 Euro). The main advantage is that you have a build-in power-unit for the electronics we will use.
- The intelligence comes from an Arduino Uno with a Velleman 4 relay card (together 25-30 Euro).
- The communication is based on a 433 Mhz RF Receiver and Transmitter set (3-8 Euro).
- The housing for the electronics is made of three ABS boxes from Conrad (8 Euro).
Hardware.png
Hardware.png (103.2 KiB) Viewed 2085 times
You will need some loose parts and material (5 Euro).
That makes a total of 60-65 Euro. Of course, you could find cheaper parts which might be fine also.

And this is what you get (or what you make):
4RelaySwitchFinalSmall.jpg
4RelaySwitchFinalSmall.jpg (5.16 KiB) Viewed 2091 times
Last edited by mjdb on Monday 22 May 2017 16:22, edited 5 times in total.
mjdb
Posts: 71
Joined: Thursday 12 January 2017 13:38
Target OS: Raspberry Pi / ODroid
Domoticz version: all beta
Location: NL - Pijnacker
Contact:

Four Socket Switch with return channel (Ikea, Arduino, Relays, KaKu) - Hardware

Post by mjdb »

The hardware

Ikea did not plan (want) you to open their Koppla box. The screw has a non-standard tri-star shape. Perhaps you will succeed in opening it. I used a drill to remove al eight screws.

Inside you see four sockets connected with two copper-stripes. At one side there is a mains-switch. At the opposite side you see the electronics for the USB charger. You take out one of the stripes and cut it in four peaces. Try to saw exactly in the middel of the plastic holders. I used a Dremel with a miniature grinding disk. At each section you solder a seperate power-wire. The USB-unit should get its own power-wire.

By cutting the stripe in four segments it looses its strength. So you have the make a firm connection when you place the segments back. I used a synthetic resin for this (Bondic). Bondic is used like glue. It hardens with a small ultra violet led that comes with it.
KopplaBondicDetail2.jpg
KopplaBondicDetail2.jpg (68.82 KiB) Viewed 2086 times
From the switch you add a power-wire to the USB-unit and a wire to power the relays.
You cut the two wires of the USB-unit and (re)connect them with two wires that will power the electronics.

You modified Koppla should look like this:
KopplaModified.jpg
KopplaModified.jpg (79.61 KiB) Viewed 2086 times
The sockets will have to resist a rather big force when a plug is inserted. I choose to close the hardware with bolts (5 cm x 3 mm) and nuts (3 mm), so I made holes from top to bottom at the places where the original screws were, plus some extra.

Then I added the three boxes for the electronics. You see the holes were the USB-power (left) and the 220 volt power-wires come through.

You will have to shorten some bolts to allow space for the Arduino and the relay-card. Note that I left one bolt at length. Also, you see the opening for the USB-connector.
HousingSideView.jpg
HousingSideView.jpg (14.34 KiB) Viewed 2086 times
Last edited by mjdb on Monday 22 May 2017 16:23, edited 2 times in total.
- - - - - - - - - - -
2 x Domoticz on Raspberry Pi; 2 x RFXtrx433; Aeotec Z-Stick
KlikAanKlikUit ICS-2000 as Relay
Aeotec MultiSensors 6; Danfoss Z Thermostats 014G0013; Kaku Switches, Z-wave Switches
mjdb
Posts: 71
Joined: Thursday 12 January 2017 13:38
Target OS: Raspberry Pi / ODroid
Domoticz version: all beta
Location: NL - Pijnacker
Contact:

Four Socket Switch with return channel (Ikea, Arduino, Relays, KaKu) - The Electronics

Post by mjdb »

The electronics

I gave the relay-card three small "legs" made of a bolt (1 cm x 3 mm) and two nuts. The fourth hole was placed on one of the large bolts of the housing (in the picture bottom-left) to keep it in place.
There is one wire that provides power and four wires that go to the relay-card.
RelayCardWithWires.jpg
RelayCardWithWires.jpg (23.88 KiB) Viewed 2085 times
I put the Arduino in the left box. It also has three "legs" made from a bolt and two nuts. This picture shows work-in-progress in the testing phase. Look at the nut bottom-right that holds the Arduino in place.
ArduinoInPlacePhase1.jpg
ArduinoInPlacePhase1.jpg (81.03 KiB) Viewed 2085 times
At the right side of the Arduino you see a small soldering-board where all power wires are connected.

In the right-most box I placed the receiver and the sender. I choose this to be as far as possible from the USB-power-supply to avoid disturbance.
Box3SenderAndReceiver.jpg
Box3SenderAndReceiver.jpg (34.89 KiB) Viewed 2085 times
Last edited by mjdb on Monday 22 May 2017 16:23, edited 3 times in total.
- - - - - - - - - - -
2 x Domoticz on Raspberry Pi; 2 x RFXtrx433; Aeotec Z-Stick
KlikAanKlikUit ICS-2000 as Relay
Aeotec MultiSensors 6; Danfoss Z Thermostats 014G0013; Kaku Switches, Z-wave Switches
mjdb
Posts: 71
Joined: Thursday 12 January 2017 13:38
Target OS: Raspberry Pi / ODroid
Domoticz version: all beta
Location: NL - Pijnacker
Contact:

Four Socket Switch with return channel (Ikea, Arduino, Relays, KaKu) - The electronics (2)

Post by mjdb »

The wires were guided and ordered.
Box1DecentWires.jpg
Box1DecentWires.jpg (44.83 KiB) Viewed 2085 times
And connected to the Arduino.
PowerConnector.jpg
PowerConnector.jpg (46.13 KiB) Viewed 2085 times
Note the connector from the USB power-supply to the electronics. During development and testing you should NOT use the USB power-supply but the power from the development-computer cable. When you disconnect the computer, you can connect the electronics to the internal power supply. I suppose you can forget this only once.
Last edited by mjdb on Monday 22 May 2017 16:23, edited 2 times in total.
- - - - - - - - - - -
2 x Domoticz on Raspberry Pi; 2 x RFXtrx433; Aeotec Z-Stick
KlikAanKlikUit ICS-2000 as Relay
Aeotec MultiSensors 6; Danfoss Z Thermostats 014G0013; Kaku Switches, Z-wave Switches
mjdb
Posts: 71
Joined: Thursday 12 January 2017 13:38
Target OS: Raspberry Pi / ODroid
Domoticz version: all beta
Location: NL - Pijnacker
Contact:

Four Socket Switch with return channel (Ikea, Arduino, Relays, KaKu) - Domoticz

Post by mjdb »

In Domoticz

To use the 4 relay switch from Domoticz you define four devices/switches. I choose to give them all the same address (1A0EEEE) with different unit-numbers 1, 2, 3 and 4. Any address will do. Of course you can also use the codes of existing switches so you can use these switches to turn the 4 relay switch on or off.

For the return channel you define four more devices with their own address (I choose 1A0EEFE). Give all four this address with unit-numbers 1, 2, 3 and 4.
DomoticzDevices.png
DomoticzDevices.png (19.43 KiB) Viewed 2085 times
Look carefully, the difference is in the ending: EE versus FE.

When you send an On or Off command to the 4 Relay switch it will send a response command according to the corresponding response-device. This in turn will be turned On or Off accordingly. So, if you send an On command to switch 2, one second later, the response-device number 2 should also be On. If not, something has gone wrong and you can take appropriate action in your Domoticz-script. The same goes for an Off command. If you switch a device Off, the corresponding response-device should also switch to Off. If not, let some script retry or whatever.

Hint: Don't let your script wait for the answer, this will hold up Domoticz. As an alternative, let some minute-script check if the state of the switch and the state of the response-device are identical.
Last edited by mjdb on Monday 22 May 2017 16:23, edited 4 times in total.
- - - - - - - - - - -
2 x Domoticz on Raspberry Pi; 2 x RFXtrx433; Aeotec Z-Stick
KlikAanKlikUit ICS-2000 as Relay
Aeotec MultiSensors 6; Danfoss Z Thermostats 014G0013; Kaku Switches, Z-wave Switches
mjdb
Posts: 71
Joined: Thursday 12 January 2017 13:38
Target OS: Raspberry Pi / ODroid
Domoticz version: all beta
Location: NL - Pijnacker
Contact:

Four Socket Switch with return channel (Ikea, Arduino, Relays, KaKu) - The Software

Post by mjdb »

The Software

A program for an Arduino is called a Sketch. I am not at all an Arduino specialist but I googled until I had the working parts for my program, uh... sketch.

For the communication I use two libraries that allow to send KaKu commands. These libraries are NewRemoteReceiver and
NewRemoteTransmitter. You can find them and install them on the internet. That goes beyond the scope of this article.

The sketch initializes the Arduino by telling what connectors (pins) have what purpose. Also, the device-addresses are defined. You can decide if you will use debugging and if you want to use the return-channel.

When the sketch starts, the device-addresses are translated to numerical values. All relays will be off. So the sketch sends an off-command to Domoticz so that the states are equal. Also the return-channels are reset.

The Sketch should be self-explainatory.

Code: Select all


#include <NewRemoteReceiver.h>
#include <NewRemoteTransmitter.h>

#define MonitorLed 13

bool Debug = true;
bool UseReturnChannel = true;

String KaKuCodeInHex = "1A0EEEE"; // address of switches to turn on or off
String KaKuCodeOutHex = "1A0EEFE"; // address of the return channel devices

unsigned long KaKuCodeInNum = 0; // will contain the numerical value
unsigned long KaKuCodeOutNum = 0;

int RelayPin[4] = {8, 9, 10, 11}; // each relay has its own pin
int RelayState[4] = {0, 0, 0, 0}; // all relays begin Off
int ResponsePending[4] = {0, 0, 0, 0}; // No reponses pending yet
int SelectUnit = 0; // will contain the number of the selected unit

unsigned long LastCommandTimer = 0;

// Function KaKuHexToNum translates the hex-address of a device
// to the numerical equivalent.
unsigned long KaKuHexToNum(String HexInput) {
  String HexChars = "0123456789ABCDEF";
  unsigned long result = 0;
  for (int i = 0; i<7; i++) {
    result = result * 16 + HexChars.indexOf(HexInput.substring(i, i+1));
  }
  return result;
} // KaKuHexToNum

// Function KaKuSend transmits the confirmation of a received
// command.
void KaKuSend(unsigned long SendAddress, int SendUnit, bool SendState) {
  if (Debug == true) {
    Serial.print("Zenden: ");
    Serial.print(SendAddress);
    Serial.print("; Unit: ");
    Serial.print(SendUnit);
    Serial.print("; State: ");
    Serial.print( SendState);    
    Serial.println("");
  } // if Debug   
  // When sending commands, the receiver should be disabled.
  // Otherwise the Arduino will flood itself.
  NewRemoteReceiver::disable();
  NewRemoteTransmitter transmitter(SendAddress, 3, 260, 3);
  // address, pin, duration, repeat-factor (2^3)
  transmitter.sendUnit(SendUnit, SendState);
  // and re-enable the receiver again.
  NewRemoteReceiver::enable();
} // KaKuSend

void setup() {

  // Calculate the numerical equivalents of the device-addresses.
  KaKuCodeInNum = KaKuHexToNum(KaKuCodeInHex);
  KaKuCodeOutNum = KaKuHexToNum(KaKuCodeOutHex);

  if (Debug == true) {
    Serial.begin(115200);    
    Serial.print("Listen to: ");
    Serial.print(KaKuCodeInNum);
    Serial.println("");
  } // if Debug
    
  // Initialize receiver on interrupt 0 (= digital pin 2), calls the callback "ProcessCode"
  // after 2 identical codes have been received in a row. (thus, keep the button pressed
  // for a moment)
  NewRemoteReceiver::init(0, 2, ProcessCode);
  // See the interrupt-parameter of attachInterrupt for possible values (and pins)
  // to connect the receiver.
  
  // Initialise the Arduino data pins for OUTPUT
  Serial.println("Initialize...");
  for (int i = 0; i<4; i++) {
    pinMode(RelayPin[i], OUTPUT); // select pin for this relay
    digitalWrite(RelayPin[i], LOW); // switch relay off
  }
  pinMode(MonitorLed, OUTPUT);
  
  // Blink the led on the Arduino three times to show the Sketch has started.
  if (Debug == true) {
    for (int i = 0; i<3; i++) {
      digitalWrite(MonitorLed, HIGH);
      delay(300);
      digitalWrite(MonitorLed, LOW);
      delay(300);
    } // for i
  } // if Debug

  Serial.println("Reset Switch-states...");

  // Reset the states of the switches in Domoticz.
  for (int i = 0; i<4; i++) {
    KaKuSend(KaKuCodeInNum, i, false);
    delay(100);
  }
    
  // Reset the states of the return-channels in Domoticz.
  if (UseReturnChannel == true) {    
    Serial.println("Reset Return-channels...");
    for (int i = 0; i<4; i++) {
      KaKuSend(KaKuCodeOutNum, i, false);
      delay(100);
    }
  } // if UseReturnChannel

  // Blink the led on the Arduino three times to show the Sketch has initialized.
  if (Debug == true) {
    for (int i = 0; i<3; i++) {
      digitalWrite(MonitorLed, HIGH);
      delay(300);
      digitalWrite(MonitorLed, LOW);
      delay(300);
    } // for i
  } // if Debug

} // setup

void loop() {

  if (UseReturnChannel == true) {
    
    // wait for 2 seconds no 433 Mhz Traffic
    if ((millis() - LastCommandTimer) > 2000) {
      
      if (Debug == true) {
        Serial.print(LastCommandTimer);    
        Serial.println("");      
      }

      for (int i = 0; i<4; i++) {
        if (ResponsePending[i] > 0) {
          KaKuSend(KaKuCodeOutNum, i, RelayState[i]);
          ResponsePending[i] = ResponsePending[i] - 1;
          break;
        }
      } // for all relays

      LastCommandTimer = millis();

    } // 1 second no traffic
    
    delay(100);
    
  } // if UseReturnChannel

} // Loop

// ProcessCode function is called when a valid KaKu-code is received.
void ProcessCode(NewRemoteCode receivedCode) {

  // Save the counter for the last command
  LastCommandTimer = millis();

  if (Debug == true) {
    Serial.print("Received: ");
    Serial.print(receivedCode.address);
    Serial.print("; Unit: ");
    Serial.print(receivedCode.unit);
    Serial.print("; Type: ");
    Serial.print(receivedCode.switchType);    
    Serial.println("");
  } // if Debug

  // The four devices are numbered from 1 to 4 in Domoticz.
  // The transmitted unit-numbers count from 0 to 3.
  SelectUnit = receivedCode.unit;
  if (SelectUnit > 3) {
    return; // Can't be for the 4RelaySwitch
  }

  // KaKu commands can contain On, Off or a Dim command.
  // The Dim command is not used in this Sketch. We treat it as an On command.
  switch (receivedCode.switchType) {
    case 0:
      RelayState[SelectUnit] = LOW;
      break;
    case 1:
      RelayState[SelectUnit] = HIGH;
      break;
    case 2:
      RelayState[SelectUnit] = HIGH;
      break;
  } // switch switchType

  // Now, see if the received code contains the address of the 4 Relay switch.
  if (receivedCode.address == KaKuCodeInNum) {
    // This program-part is only executed if the received address
    // was identical to the address of the 4 Relay switch.
    // Set the Relay accordingly
    digitalWrite(RelayPin[SelectUnit], RelayState[SelectUnit]);
    ResponsePending[SelectUnit] = 2; // 2 confirmations   
  } // if KaKuCoddeInNum
  
} // ProcessCode

I suggest you develop the Sketch bit by bit. The use of relays and RF communication is widely described on the internet.
First see if you can switch the relays without the use of communication.
Then, make a different sketch and see if you can receive and interpret KaKu commands. The library NewRemoteReceiver has perfectly usable examples. The same goes for examples from the NewRemoteTransmitter library.
If you combined this to a working system, add the return-channel.
When it all works, disconnect the development-computer, connect the power from the USB power and close the housing.

Then, the system should work stand-alone.

After testing and verifying you can close the housing and you should have something like this.
4RelaySwitchFinal.jpg
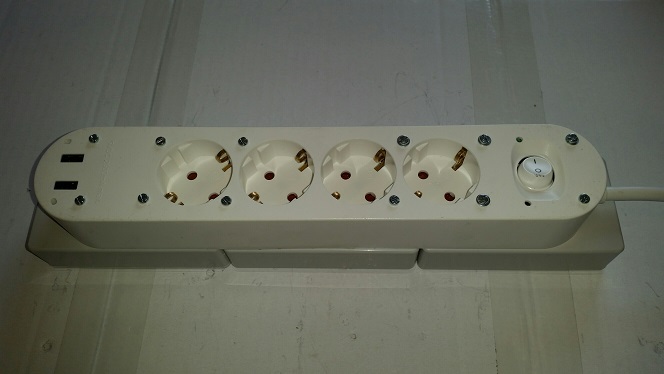
4RelaySwitchFinal.jpg (46.04 KiB) Viewed 2085 times
Last edited by mjdb on Tuesday 23 May 2017 10:15, edited 7 times in total.
- - - - - - - - - - -
2 x Domoticz on Raspberry Pi; 2 x RFXtrx433; Aeotec Z-Stick
KlikAanKlikUit ICS-2000 as Relay
Aeotec MultiSensors 6; Danfoss Z Thermostats 014G0013; Kaku Switches, Z-wave Switches
mjdb
Posts: 71
Joined: Thursday 12 January 2017 13:38
Target OS: Raspberry Pi / ODroid
Domoticz version: all beta
Location: NL - Pijnacker
Contact:

Four Socket Switch with return channel (Ikea, Arduino, Relays, KaKu) - Final Thoughts

Post by mjdb »

Additional thoughts

When you have it all working, you can expand the possibilities with only little costs.

For example, it will be quite easy to add another four relay card to use eight outlets.

Please share you own modifications and additions so others can benefit from it.
- - - - - - - - - - -
2 x Domoticz on Raspberry Pi; 2 x RFXtrx433; Aeotec Z-Stick
KlikAanKlikUit ICS-2000 as Relay
Aeotec MultiSensors 6; Danfoss Z Thermostats 014G0013; Kaku Switches, Z-wave Switches
Post Reply

Who is online

Users browsing this forum: No registered users and 1 guest